The next six short films I am going to make will be:
-One of the trees along The Queens walk
-One by car from the other side of the river
-One by bicycle along the floor level of The South Bank
-One by train, route yet to be decided
-One of the approach to The South Bank, from Waterloo passing under the railway arches and along the steps besides Royal Festival Hall
-One leaving The South Bank or one travelling past by boat.
How can the lighting from the film be used to sculpt or develop new space?
I will take stills from the films, I will need them in sets of 30 so every few frames I will take a still. These will then be printed out all in the same size. I will have sheets of acetate that I will mark on where the points of light are using the print outs. Then I will puncture a hole where the centre of the light point is. The hole will be just big enough for a needle and thread to fit through. Then I will need to assemble the acetate to a card base. The base will be scored evenly so that the acetate can slide into it. Then I will thread cotton through the holes following the journey of the light. This could start to sculpt new spaces which have been generated by my films and become physical 3D models of the speculative space.
I will then need to bring the space that has been created and the films back together. The film would start off with one of the recordings made, then the film would fade and we would start to see this space being built from lines. It would keep switching between the films of the existing space and the new spaces that are being built.
Tuesday, 29 March 2011
Films on the South Bank
These films have extracted the light from the site and have turned it into a black and white film. White is the light coming from the site. The first set of films shown are the recordings of the site which have then had a process applied to give these films as the outcome. The second set of films are the stabilized versions. There is still some shakiness in the films which were recorded whilst I walked along.
The most successful film in terms of steadiness are the ones that have been recorded whilst being in the car. The films that have been filmed whilst walking have to have more stabilizing applied to them. You can see that this brings of a quality of flickering to the film, sometimes almost like a camera lens shake. I need a way for device to eliminate this completely meaning that the editing process would be quicker.
First set of films.
Car Journey 1 from Lauren McEwen on Vimeo.
Car Journey 2 from Lauren McEwen on Vimeo.
Car Journey 3 from Lauren McEwen on Vimeo.
Looking up 360 degree turn from Lauren McEwen on Vimeo.
Eye level 360 degree turn from Lauren McEwen on Vimeo.
Moving through the trees from Lauren McEwen on Vimeo.
One level up from Lauren McEwen on Vimeo.
Second set of films.
Car Journey 1 edited from Lauren McEwen on Vimeo.
Car Journey 2 edited from Lauren McEwen on Vimeo.
Car Journey 3 edited from Lauren McEwen on Vimeo.
Monday, 28 March 2011
Results from Car Test Films
Test 1: Quite a jumpy film where it has been stabilised but the quality and definition of the light is what I want to show in the film.
Test 1.1: There appears to be a camera lens flicker that has been reduced compared to the other Test 1's. The white light is still very defined. There is a smooth flowing motion through sections of the films.
Test 1.2: The blur is helping to reduce shaking which has come from the stabilising. The blurring effect used in these has transformed the rounded shapes of lights into squares, which almost look like giant pixels.
Test 1.3: The white light is defined. Any of the light further away has a camera lens flicker and shake to it. As the light moves closer to the screen it smooths out and glides past.
Test 1.4: Very smooth fly through. Very little camera shaking lens effect. The blurriness of the light is less than the rest yet has the smoothest outcome.
Test 1.5: Less definition of the white light, when watching the film it looks to be more like a fly through. The blurriness helps with smoothing out any shakiness and creates a smooth fly through.
Test 1.6: There is a slight camera lens shake, this is an effect that has come from the stabilising. There are parts which jump due to the stabilising missing a point or not tracking properly. When the white light is solid and has a defined edge, the shaking becomes more visible.
Test 2: To begin with this film was quite smooth and just needed to be stabilized. The white light was well defined from the original film meaning that no effects were used and the quality wasn't compromised.
Test 2.1: The film is very blurred due to the effect used. The more steady the film is, means the more defined the white light can be. The only reason for the blurred light is when the film isn't great and there is quite a lot of movement ,the blurriness seems rectify this and merge the light patterns into one.
Test 2.2: The light is well defined. There is very little shaking or flickering created by the stabilising. The way the film enters the screen from the top right hand corner is very subtle and introduces you to the film slowly.
Test 2.3: To begin with the film enters in the top right hand corner. There are light flashes of light as the film enters the screen. As the journey progresses the lights in the distance are dull but as they move closer it increases the brightness.
Test 2.4: There is really smooth movement which has come from stabilising the film. The effects seem to dull the quality film.
Test 3: Well defined white light path, no blurriness. There is a slight camera movement and occasional jumps. This is all down to my skills of stabilising the film.
Test 3.1: The effect used has created a pixelated film. This is not what I want to show in my films. You loose the quality of the light path which is what I want to be seen in the films.
Test 3.2: Blurriness has helped to smooth the shakiness out from the videos. It does dull the tone of the light path but becomes a film that is easy to follow as it is a smooth film.
Test 3.3: There is too much movement in this film. The film when shown is only occupying part of the screen. The light path becomes grainy when following the journey that is being made.
Test 4: The white light is defined. The last two clips move very smoothly through the space but there is some camera lens shake which has come from the stabilization.
Test 4.1: The film is very shaky and removes every element that the film was a recording of a space.
Test 4.2: The blurriness in this film has now become a pixelated effect. It starts to look as if it is a recording of a space with lights not a film that is an extraction of lights from a space.
Test 4.3: This film does look quite grainy but its nice to see that when this was recorded it was at night so the car headlights were on, not only can we see the lights recorded on the road but also the projections on surfaces from the car headlights.
Sunday, 27 March 2011
Start Storyboarding
The technique I have been using to create storyboards is to, first plan what I want to show, this consists of looking at the photos and planning what the shot will show. I decided which device I will be using to create the film, which route I am going to be taking and an elevation showing the lights that I am recording. These are all shown in drawings. These are placed on the beginning of a long strip of paper, I then start to mark out on the strip what I want to show in the film, so for every few seconds there is a drawing. These drawings are made from ink.
Now these storyboards are going to be something similar in the style of Bernard Tschumi, shown below. When looking at this image we first see lines of drawings, these are showing events that happen, below these are spaces which have been designed from the events that happen.
 These drawings show a lot of information in one single image. Looking at how Tschumi shows the forms he has designed from the events could possibly help lead me onto the next step in my project.
The storyboards that I have drawn give us four pieces of information. 1) Showing which route I explore along the site. 2) The elevation of the space being explored and the light which is being filmed is highlighted. 3) The device being used to film the space and 4) How I expect the film to look.


Now these storyboards are going to be something similar in the style of Bernard Tschumi, shown below. When looking at this image we first see lines of drawings, these are showing events that happen, below these are spaces which have been designed from the events that happen.

The storyboards that I have drawn give us four pieces of information. 1) Showing which route I explore along the site. 2) The elevation of the space being explored and the light which is being filmed is highlighted. 3) The device being used to film the space and 4) How I expect the film to look.


Sequence Four Tests
These tests have all been taken from the fourth film. They all have been stabilized but have had different effects layered on to them.
Test 4:
-Stabilized
Test 4.1:
-Box Blur: Blur Radius: 11 and Iterations: 1
Test 4.2:
-Gaussian Blur: Blurriness: 11.6 and Blur Dimensions: Horizontal and Vertical
-Sharpen: Sharpen amount: 88
Test 4.3:
-Bilateral Blur: Blurriness: 5.5 and Blur Dimensions: Horizontal and Vertical
Test 4:
-Stabilized
Test 4.1:
-Box Blur: Blur Radius: 11 and Iterations: 1
Test 4.2:
-Gaussian Blur: Blurriness: 11.6 and Blur Dimensions: Horizontal and Vertical
-Sharpen: Sharpen amount: 88
Test 4.3:
-Bilateral Blur: Blurriness: 5.5 and Blur Dimensions: Horizontal and Vertical
Sequence Three Tests
These tests have all been taken from the third film. They all have been stabilized but have had different effects layered on to them.
Test 3:
-Stabilized
Test 3.1:
-Box Blur: Blur Radius: 9 and Iterations: 4
-Brightness and Contrast: Brightness: 26 and Contrast: 13
Test 3.2:
-Gaussian Blur: Blurriness: 12 and Blur Dimensions: Horizontal and Vertical
Test 3.3:
-Bilateral Blur: Blurriness: 7 and Blur Dimensions: Horizontal and Vertical
Sequence Two Tests
These tests have all been taken from the second film. They all have been stabilized but have had different effects layered on to them.
Test 2:
-Stabilized
Test 2.1:
-Box Blur: Blur radius: 8 Iterations: 1 Horizontal and Vertical
2.1 from Lauren McEwen on Vimeo.
Test 2.2:
-Box Blur: Blur radius: 8 Iterations: 1 Horizontal and Vertical
-Contrast: Brightness: 43 and Contrast: 100
2.2 from Lauren McEwen on Vimeo.
Test 2.3:
-Gaussian Blur: Blurriness: 16.3 and Blur dimensions: Horizontal and Vertical
2.3 from Lauren McEwen on Vimeo.
Test 2.4:
- Bilateral Effect: Radius: 209 and Threshold: 64
Sequence One Tests
These tests have all been taken from the first film. They all have been stabilized but have had different effects layered on to them.
Test 1:
-Stabilized
1 from Lauren McEwen on Vimeo.
Test 1.1:
1.1 from Lauren McEwen on Vimeo.
Test 1.2:
-Reduced interlace flicker: 0.5
1.2 from Lauren McEwen on Vimeo.
Test 1.3:
1.3 from Lauren McEwen on Vimeo.
Test 1.4:
-Box Blur: Blur radius: 9 and Iterations: 1
1.4 from Lauren McEwen on Vimeo.
Test 1.5:
-Gaussian Effect: Blurriness: 20.7 and Blur dimensions: Horizontal and Vertical
1.5 from Lauren McEwen on Vimeo.
Test 1.6:
- Bilateral Blur: Blurriness: 5.8 and Blur dimensions: Horizontal and Vertical
1.6 from Lauren McEwen on Vimeo.
Test 1:
-Stabilized
1 from Lauren McEwen on Vimeo.
Test 1.1:
-Reduced interlace flicker: 0.5
-Sharpen: 238
-Fast Blur: 10.0 Horizontal and Vertical
-Directional Blur: 14.8
-Contrast: Contrast: 100
1.1 from Lauren McEwen on Vimeo.
Test 1.2:
-Reduced interlace flicker: 0.5
-Sharpen: 238
-Fast Blur: 10.0 Horizontal and Vertical
-Directional Blur: 14.8
1.2 from Lauren McEwen on Vimeo.
Test 1.3:
-Reduced interlace flicker: 0.5
-Sharpen: 238
-Fast Blur: 10.0 Horizontal and Vertical
-Directional Blur: 14.8
-Bilateral Blur: Blurriness: 94 and Blur Dimension: 30
-Contrast: Brightness: 100 and Contrast: 100
1.3 from Lauren McEwen on Vimeo.
Test 1.4:
-Box Blur: Blur radius: 9 and Iterations: 1
1.4 from Lauren McEwen on Vimeo.
Test 1.5:
-Gaussian Effect: Blurriness: 20.7 and Blur dimensions: Horizontal and Vertical
1.5 from Lauren McEwen on Vimeo.
Test 1.6:
- Bilateral Blur: Blurriness: 5.8 and Blur dimensions: Horizontal and Vertical
1.6 from Lauren McEwen on Vimeo.
Saturday, 26 March 2011
Film Test Editing
Now that I have recorded using a different journey, I can start to edit the films. I will probably need to stabilize most of the films. Even though the device is helping to eliminate most of shaking there is still parts where the device becomes unbalanced and there is an unexpected shake. I will edit out the parts that cannot be stabilized. After Effects will be used to stabilize the film and Premiere Pro to cut the film.
Using After Effects to stabilize the film sometimes means that when watching the film back you see something similar to a lense shake. There are several effects that can be used to help this run as a smooth film.
Bilateral Blur- Selectively blurs an image so that the edges and other details are preserved. The result is a softer look film.
Box Blur- Allows you to control the quality of the blur. It creates a smoother transition between colours and increases the blur.
Gaussian Blur- Softens and blurs the images.
These are all techniques that I will apply to the films to see how smooth they can become.
Wednesday, 23 March 2011
Experimentation with the Journey and Camera
The only way which I have experimented using the camera device is walking along the South Bank. I walk all along one flat path and follow the Thames. The journey that I take my device on records the space, this needs experimentation. Changing the journey, either by foot, car, bus, train or boat, will start to change the viewpoint of what I am recording.

The nine films below are testing how the device behaves in the car. The only editing that has happened to these films are the process of removing everything but the light. The experiment was to see how the well the device would behave now that I have changed form of the journey. In all of the videos you can see a swinging motion which is either when you accelerate or break in the car. The device constantly needs to be watched when you are recording otherwise you think aren't moving moving but your hand slightly is causing the device to swing. When you watch the films back you can definitely see when the car moves, for example when the road is bumpy, there is too much movement for the device to stabilize itself quickly. The surprising results of the films is how well the device behaves when you turn at a corner. It moves into the corner and then pulls itself back out quickly. Another surprising result is when you are driving at a steady pace, the lights are just slowly and smoothly passing by you. Almost as if you are just standing still and lights are flying pass.
Car test1 from Lauren McEwen on Vimeo.
Car test2 from Lauren McEwen on Vimeo.
Car test3 from Lauren McEwen on Vimeo.
Car test4 from Lauren McEwen on Vimeo.
Car test5 from Lauren McEwen on Vimeo.
Car test6 from Lauren McEwen on Vimeo.
Car test7 from Lauren McEwen on Vimeo.
Car test8 from Lauren McEwen on Vimeo.
Car test9 from Lauren McEwen on Vimeo.
Tuesday, 22 March 2011
Lighting Map of The South Bank


The editing process of my films made at the South Bank show that I have removed every element apart from the light. I have created a positive and negative film. The light becomes the positive space and everything else becomes the negative space. I have shown this in the drawing above. I have left all of the colour that I saw and only removed the outline of the drawing that was made. We can start to imagine new spaces that could be created by the light projections.
Friday, 18 March 2011
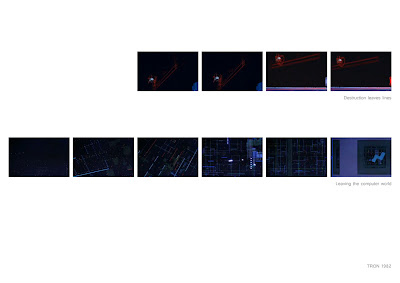
Tron 1982
Tron was released in 1982. It is a science fiction film which was directed by Steven Lisberger. Development on the film began in 1976. Lisberger was inspired by a computer game, Pong, and a sample reel from a computer firm called MAGI. Lisberger was fascinated by computer games and wanted to incorporate them. The thought was " what if we had this character that was a neon light and then Tron was then the warrior". An animation studio was set up to develop Tron with the intention of making it into an animated film. Then the decision was made to include live-action elements with the computer animation. The film was conceived to be predominantly an animated film with live action scenes acting as book ends. The rest of the film was a combination of computer generated visuals and backlit animation.


There were three designers used to create the computer world. Jean Giraud, a French comic book artist, designed the main set and costumes. Peter Lloyd, a high tech commercial artist, designed the environments. Syd Mead designed the vehicles.
Disney was approached in 1980 as they were interested in producing more daring productions. Disney agreed they were interested so a test reel was ran and they agreed they would back the production. In 1981 Tron was filmed in 65mm super Panavision due to the number of special effects. Back lit animation was a process used to create the live action scenes. The scenes were created inside the computer filmed in black and white on an entirely black set. The films were then printed on a large format Kodalith high contrast film which was the colourised with photographic and rotoscopic techniques which gave a " technological feel". This then produced high contrast, large format positives and negatives. This required lots of sheets of film and a larger workload than that of a conventional cel-animated feature. Whilst the sheets of film were being delivered there was a confusion with a batch which was still printed on leading to glowing outlines and circuit traces occasionally flickering parts as the film speed varied between batches. After the problem was discovered, it was decided that it was not going to be a problem as sounds were placed over these parts to make it look as if the computer world was malfunctioning.
More than 500 people were involved in the post-production work, including 200 inker and hand-painters in Taiwan's Cuckoo's Nest Studio.
I have watched the film and simply identified parts of the film where I think they are most relevant in what I am doing. These have then been cut into stills. The main aim of watching the film was to look at how the negatives and positives of space have been created using light.


Most of the screen shots that I have taken from Tron are how the space has been defined by light. The film has created a negative and positive simply by using a black set to film and then the neon lights to highlight the detail or boundary of an object or space. The construction of ships and objects is shown in something similar to a stop motion animation; for example when the ship was found in blocks, as it raises up in the air, piece by piece of the ship comes together. When we enter and leave the computer world we fly through the space, so we pass through all levels of light. It sometimes spins and turns direction leading us to see new formations of lights each time. The lighting arrangement is representing a city as we fly towards and away from it. At the end once we have left the computer world we watch a real city transform in light quality from day-light to night-time which brings us back to reality.
Wednesday, 16 March 2011
D.O.A ( Death On Arrival) Film Noir
D.O.A is also know as death on arrival , the film is a Film Noir. It was produced in the 1950's and was directed by Rudolph Mate. This film is considered to be the classic of the Film Noir category. The plot is frantic as it follows Frank Bigelow as he tries to find out who poisoned him and why before he dies. I have taken scenes from the film that I am interested in for the lighting qualities.
The film begins with what has been referred to as " one of cinema's most innovative opening sequences" The first scene, set at night begins as a pan down a high building, the artificial light from the windows are the only element which is visible. As we reach the bottom of the pan we see the front façade of a building and the artificial light from the buildings above and the car driving pass. When Bigelow enters the police station we have a simple overlay of two scenes. The two combined together with the top layer being partially opaque allows us to see mainly only the artificial light in both scenes. The corridor scene is a long behind-the-back tracking sequence. The black and white qualities in this scene make it a very easy film to watch as everything is the same tone and we only see the overall shape in the corridor as it is very low level of lighting. At any points when the light seems to increase is normally where the space opens up, which is then distracted by the titles being played on top of the image

Looking closely at the opening scene, we never see Bigelow's face. It is only when he reaches the homicide office that we see who he is. On the approach to the office there is a continuous light flow at the top of the film. Everything is irrelevant, this is shown by the lighting only letting us see the edge of the space and Bigelow as he walks along the corridor.

The low level lighting is used in the approach to the hotel that Bigelow has arrived at, to try and solve his murder. We arrive at this scene by a distant shot of the city, which is only visible because of the lighting in the buildings and then we are shown Bigelow arriving outside the hotel. It seems to be that anything of importance in the film is highlighted by the amount of light in the shot. For example, the car which pulls up and Bigelow gets out of is the part of the scene which is lit well, our focus is only on the action happening.

This next sequence below is the chase through the abandoned factory when Bigelow is chasing he killer. He enters through a door which allows the light in and it feels easy and there is no tension for the scene as light is associated with safety. The door is then shut and the scene darkens, you start to be afraid of what is going to happen next as he chases his killer. As he hides behinds boxes and equipment the darkness increases, it increases the apprehension as we are waiting for trouble to happen. All of a sudden a box is pushed from the upper floor which makes some birds fly away, it is almost like a breathe of fresh air as it relieves some of the tension that the audience feel. Then a chase begins, Bigelow following his killer through the space. The pace of the music is fast and intense and eventually the killer escapes back out of the door, letting light in and indicating that the chase is over and now that the light has re entered into the space, Bigelow's safety is not at risk now. The darker scenes increase apprehension for an event possibly about to happen and make it harder for the viewer to watch what is about to happen.

Approaching of the hotel was a scene that I particularly noticed as the lighting qualities stood out. When looking at the stills taken from this scene, the only noticeable parts are the artificial and the outlines of the buildings. Inside the hotel is when we see well lit scenes but we very rarely see any day light scenes. This is in-keeping with the style of the Film Noirs.

Whilst trying to identify the scenes in D.O.A which are most relevant to my work, I was thinking about an experiment of recording using different methods of travel such as car, train, and bike. The scene shown below is when Bigelow is travelling alongside an enemy in the car. It is a very smooth movement as we travel in front and alongside the car, the views we have is sometimes a far shot of the background and car travelling towards us and then at other times we get close ups of Bigelow and the enemy. The artificial light of the surrounding area is shown as we travel through the space. The way the artificial light is shown, we start to see everything being stripped down so we are left we very little in the scene so it does not become distracting.

Here we arrive back at the office to where the killer is working. The lighting in all of the next scenes are very low as we are leading up to the killer being confronted by Bigelow. We see Bigelow approach the building and the only two lights that can be seen from the exterior is where the killer is. Bigelow approaches and walks through the dark and quite corridors eventually to find the killer leaving the office. The chase begins again as they descend down a staircase which is very dark and the only parts that are lit, are where the characters move to.

Film Noir
Film Noir is a cinematic term used primarily to describe stylish Hollywood crime dramas, it is also a French term for black cinema. It is not a genre, it is more a: mood, style, point of view and a tone of a film. The genre was popularised in Hollywood during the 1940s and 1950’s. The classic film noirs’ were referred to as melodramas (define melodramas: A) a drama such as a play, film or television programme characterized by exaggerated emotions, stereotypical characters and interpersonal conflicts. B) A dramatic form that does not observe the laws of cause and effect and exaggerates emotion and emphasises the plot or action at the expense of characterization.)
Film Noirs’ are a range of plots, always with a central figure:
- A private eye ( The Big Sleep)
- A plainclothes policeman ( The Big Heat)
- An aging boxer ( The Set-up)
- A hapless grafter ( Night and The City)
- A law abiding citizen lured into a life of crime ( Gun Crazy)
- A victim of Circumstance ( D.O.A)
Film Noirs’ have a low key black and white visual style which is emphasized by low lighting and unbalanced compositions filmed with unusual camera placement, similar to German expressionist cinematography. The films evidence a variety of visual approaches which fit comfortably within the Hollywood mainstream. In the 1940s and 1950s Film Noirs, led audiences to understand and build a relationship with the protagonist or anti hero.
Other categories that come under Film Noir are:
Neo Noir is films set in contemporary modern times, but showing characteristics of a Film Noir, in plot or style. These details were typically absent or unimportant to the plot of classic Film Noir. Neo Noir is aware of modern circumstances and technology. Neo Noir films, post 1970’s, often reverse the role of the understanding and building a relationship built between the protagonists or anti hero. Unconventional camera mounts and plot progression remind the audience that they are merely watching a film and not partaking in the film.
Example of Neo Noir film: China Town
Monday, 14 March 2011
Man With A Movie Camera
"This film presents an experiment in the cinematic communication of visible events."
Man With A Movie Camera was initially watched for the techniques, to see what could be helpful to my film as I need to control the way I film.
Parts of the film show you the process used to make the film. We see the 16mm film strip with the negative on, then the process of editing using a splicer and then the playback of the film. Normally when watching a film the process gets forgotten so it was nice to see this shown in Man With a Movie Camera.
There was stop motion that was used twice in the film, one was on a long exposure so you see the way that the seats in the cinema fold down and the second was a simple stop motion of something being built up.
The overlapping and double exposures work well as it is a monochrome film, all the tones are the same. There is one scene when the film overlaps, then splits in the middle and turns, almost creating a mirrored effect.
The split screen is an simple technique that has been used to show one scene but a range of different things, for example we see a split screen made up of three sections. The top half of the screen is showing ballet dancers feet dancing, the bottom half is then divided into two. The left shows the piano being played which corresponds to the music and the right shows the dance teacher showing the students how to dance. The split screen has been used again but this time to show the movement of the trams in the city, with three different views.
Cinematic Techniques:

The film was then divided up into three sections that I identified being the main structure of the film.
Machines keep the city going:

People of the city at work:

People of the city at play:

Throughout the film the camera is present, even if its isn't on the screen we still see the shadow from the camera. Sometimes it is very subtle and we only realise once the scene has passed that the camera was visible. It is quite a nice technique to use as this was an experimental silent document and we get to see the way people react to the camera.
How the film is being filmed:

Friday, 11 March 2011
Bernard Tschumi, Le Fresnoy
These images have been taken from the book Tschumi, Le Fresnoy, Architecture In/ Between. These drawings have been made whilst Bernard Tschumi had been creating Le Fresnoy.

The drawing above is from an elevation drawing of Le Fresnoy. The floors are drawn in white and then the details, such as stairs, room divides and ceilings are drawn in black. This all has been drawn against a dark brown background. The part of the drawing I find most interesting is the light quality that has been drawn into the image. You can see where the light source is and how it could then project into the space of Le Fresnoy.
The drawing above is another of Le Fresnoy. I think that this appears to be a plan, of the light projection. There is a square box made up of arrows so this could possibly be the flow of the natural light through the building. You can also see the main source of light, shown in a solid form, and how it projects into the space. This is shown by the light fading out into the drawing, similar to the elevation. The dotted lines that you can see almost suggests that the lights can be moved around the space from point to point.
This is a really nice technique that has been used to make these drawings and would like to apply it to the drawings that I have made of the artificial light on the South Bank, shown below.

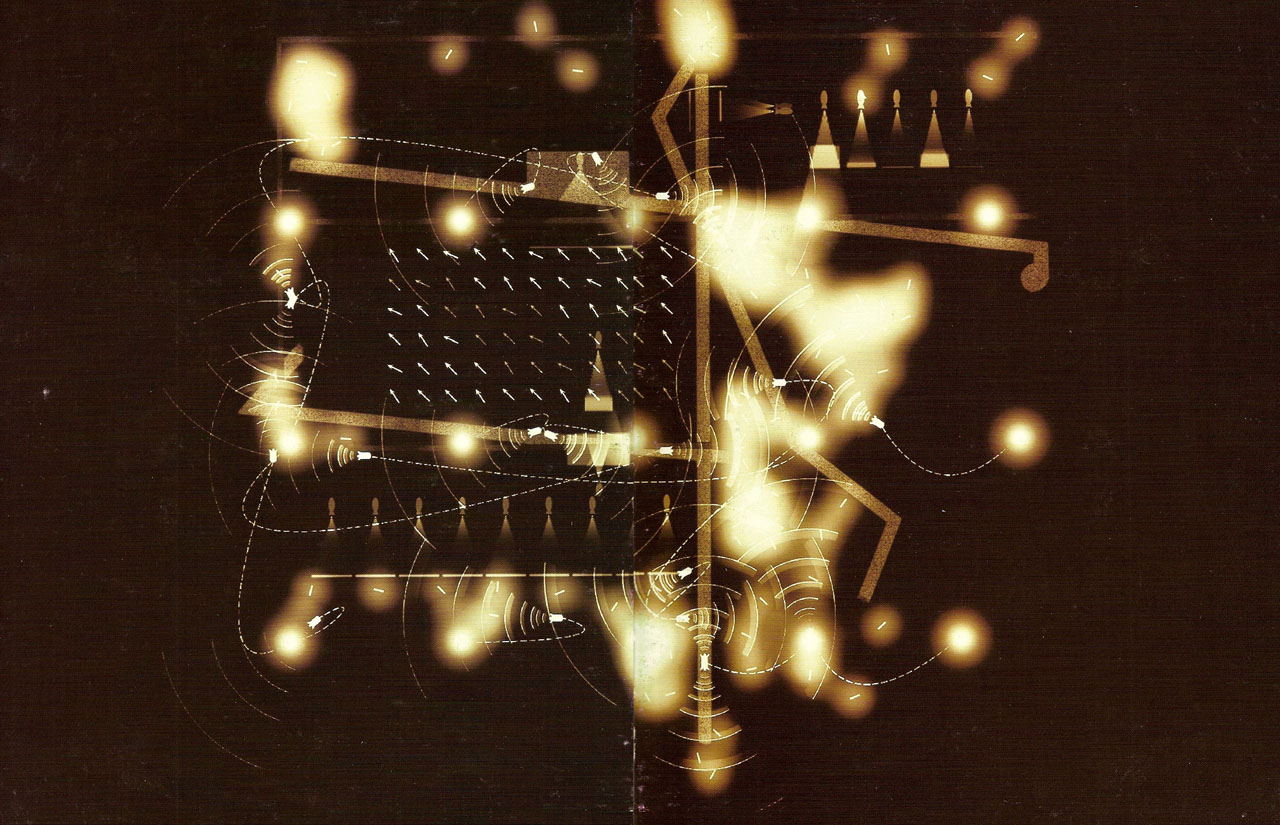
Tschumi is fascinated by cinematic montage, which he sees as linked to the relationship between architectural space, movement, and the "architecture-event," or action within space. This drawing below shows a montage of filmstrip "beams" in which events generate from and continue to unfold as life takes shape in the complex. These images below are from the drawings series that were made for Le Fresnoy.
Looking at both of the images, the monochrome one was drawn first. Then came the second version which is a development of the first. The only part which has colour added to it is the forms that have been generated by events shown in the film strip. The coloured forms that have been included in the drawing are also showing light projection. After looking at these drawings I think that these would have been the first part of the drawing process for Le Fresnoy. Once these have been drawn, they were then translated into the drawings with the light projection.


Subscribe to:
Comments (Atom)